Summary: This tutorial shows how to quickly build a simple ticket system using Microsoft Forms, Planner, and Power Automate – including Teams notifications when a ticket is created and a completion message when it’s closed.
Go to Part 2
Target Picture & Prerequisites
Goal: A simple ticket system that automatically converts submissions from Forms into Planner tasks, sorts them into buckets, and notifies the requester in Teams. Upon completion, a feedback message is automatically sent.
Prerequisites
- Microsoft 365 tenant with access to Forms, Planner (Tasks in Teams), Power Automate, and Teams
- Basic permissions to create flows and Planner plans
- Optional: a dedicated sandbox group for the Planner plan
Architecture at a Glance
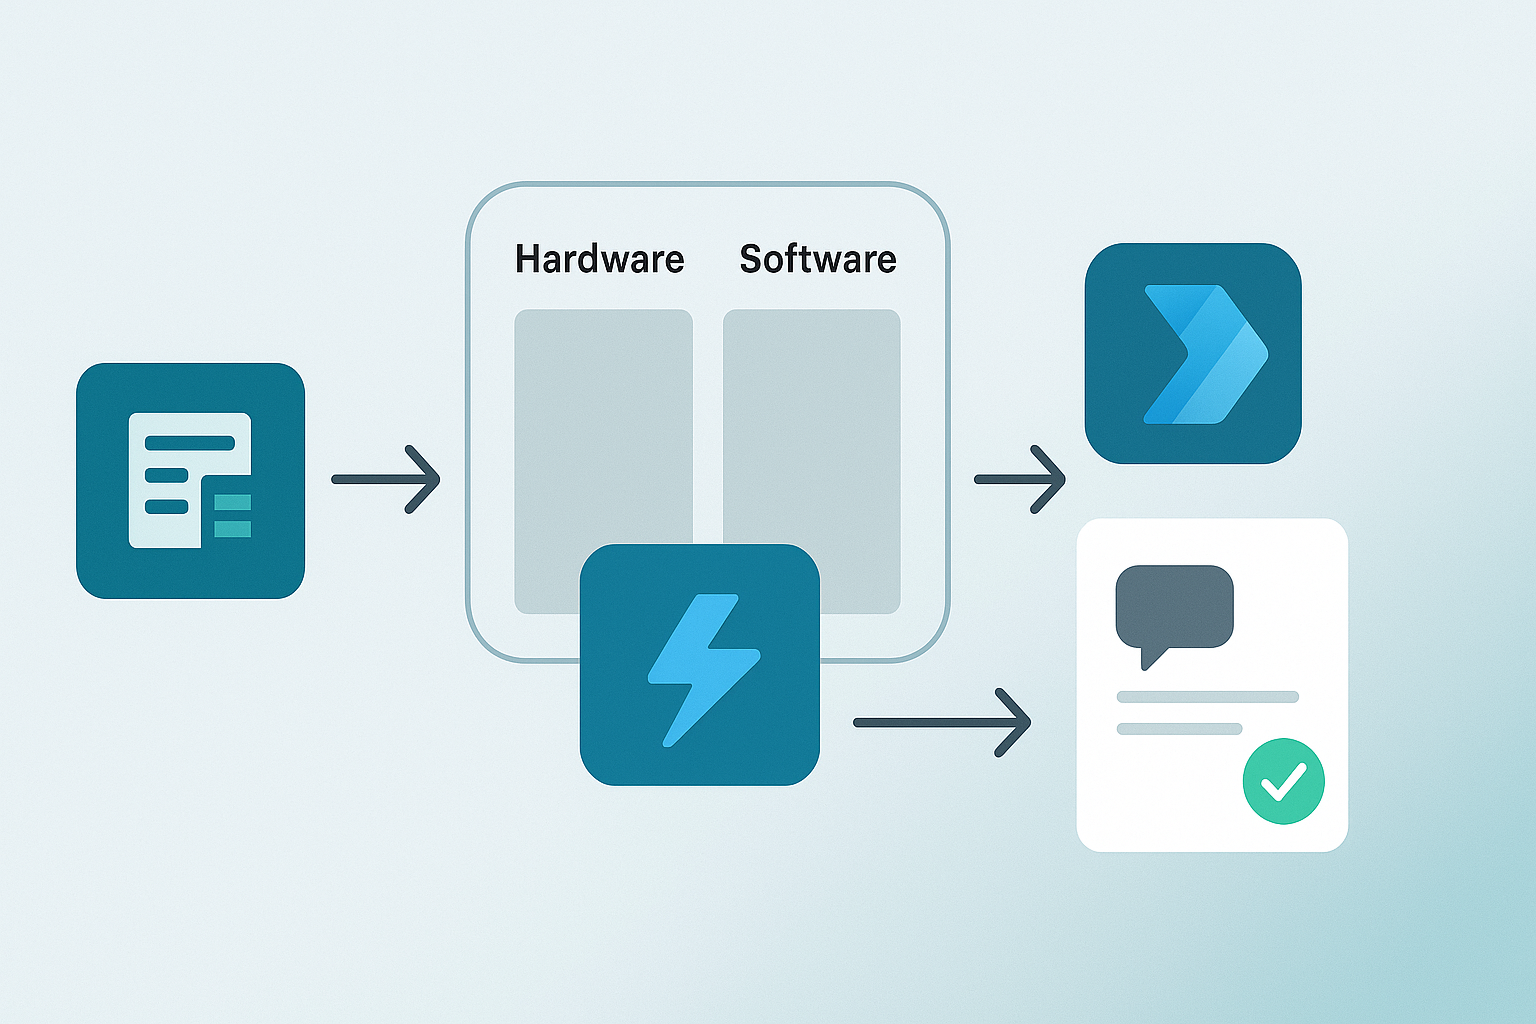
For the entire ticket system, you only need 4 simple components:
The components of the ticket system.
- Forms: Ticket submission (title, description, category e.g. hardware/software, name/email)
- Planner: Plan with buckets (e.g. “Hardware”, “Software”) – tickets are created here as tasks
- Power Automate #1 (When a new response is submitted – Forms):
Get response → create Planner task → set details/description → write sender’s email to the checklist → sort into bucket by category → send Teams notification to the person - Power Automate #2 (When a task is completed – Planner):
React to completion → read checklist from task (email) → get profile → send completion notification to the person in Teams
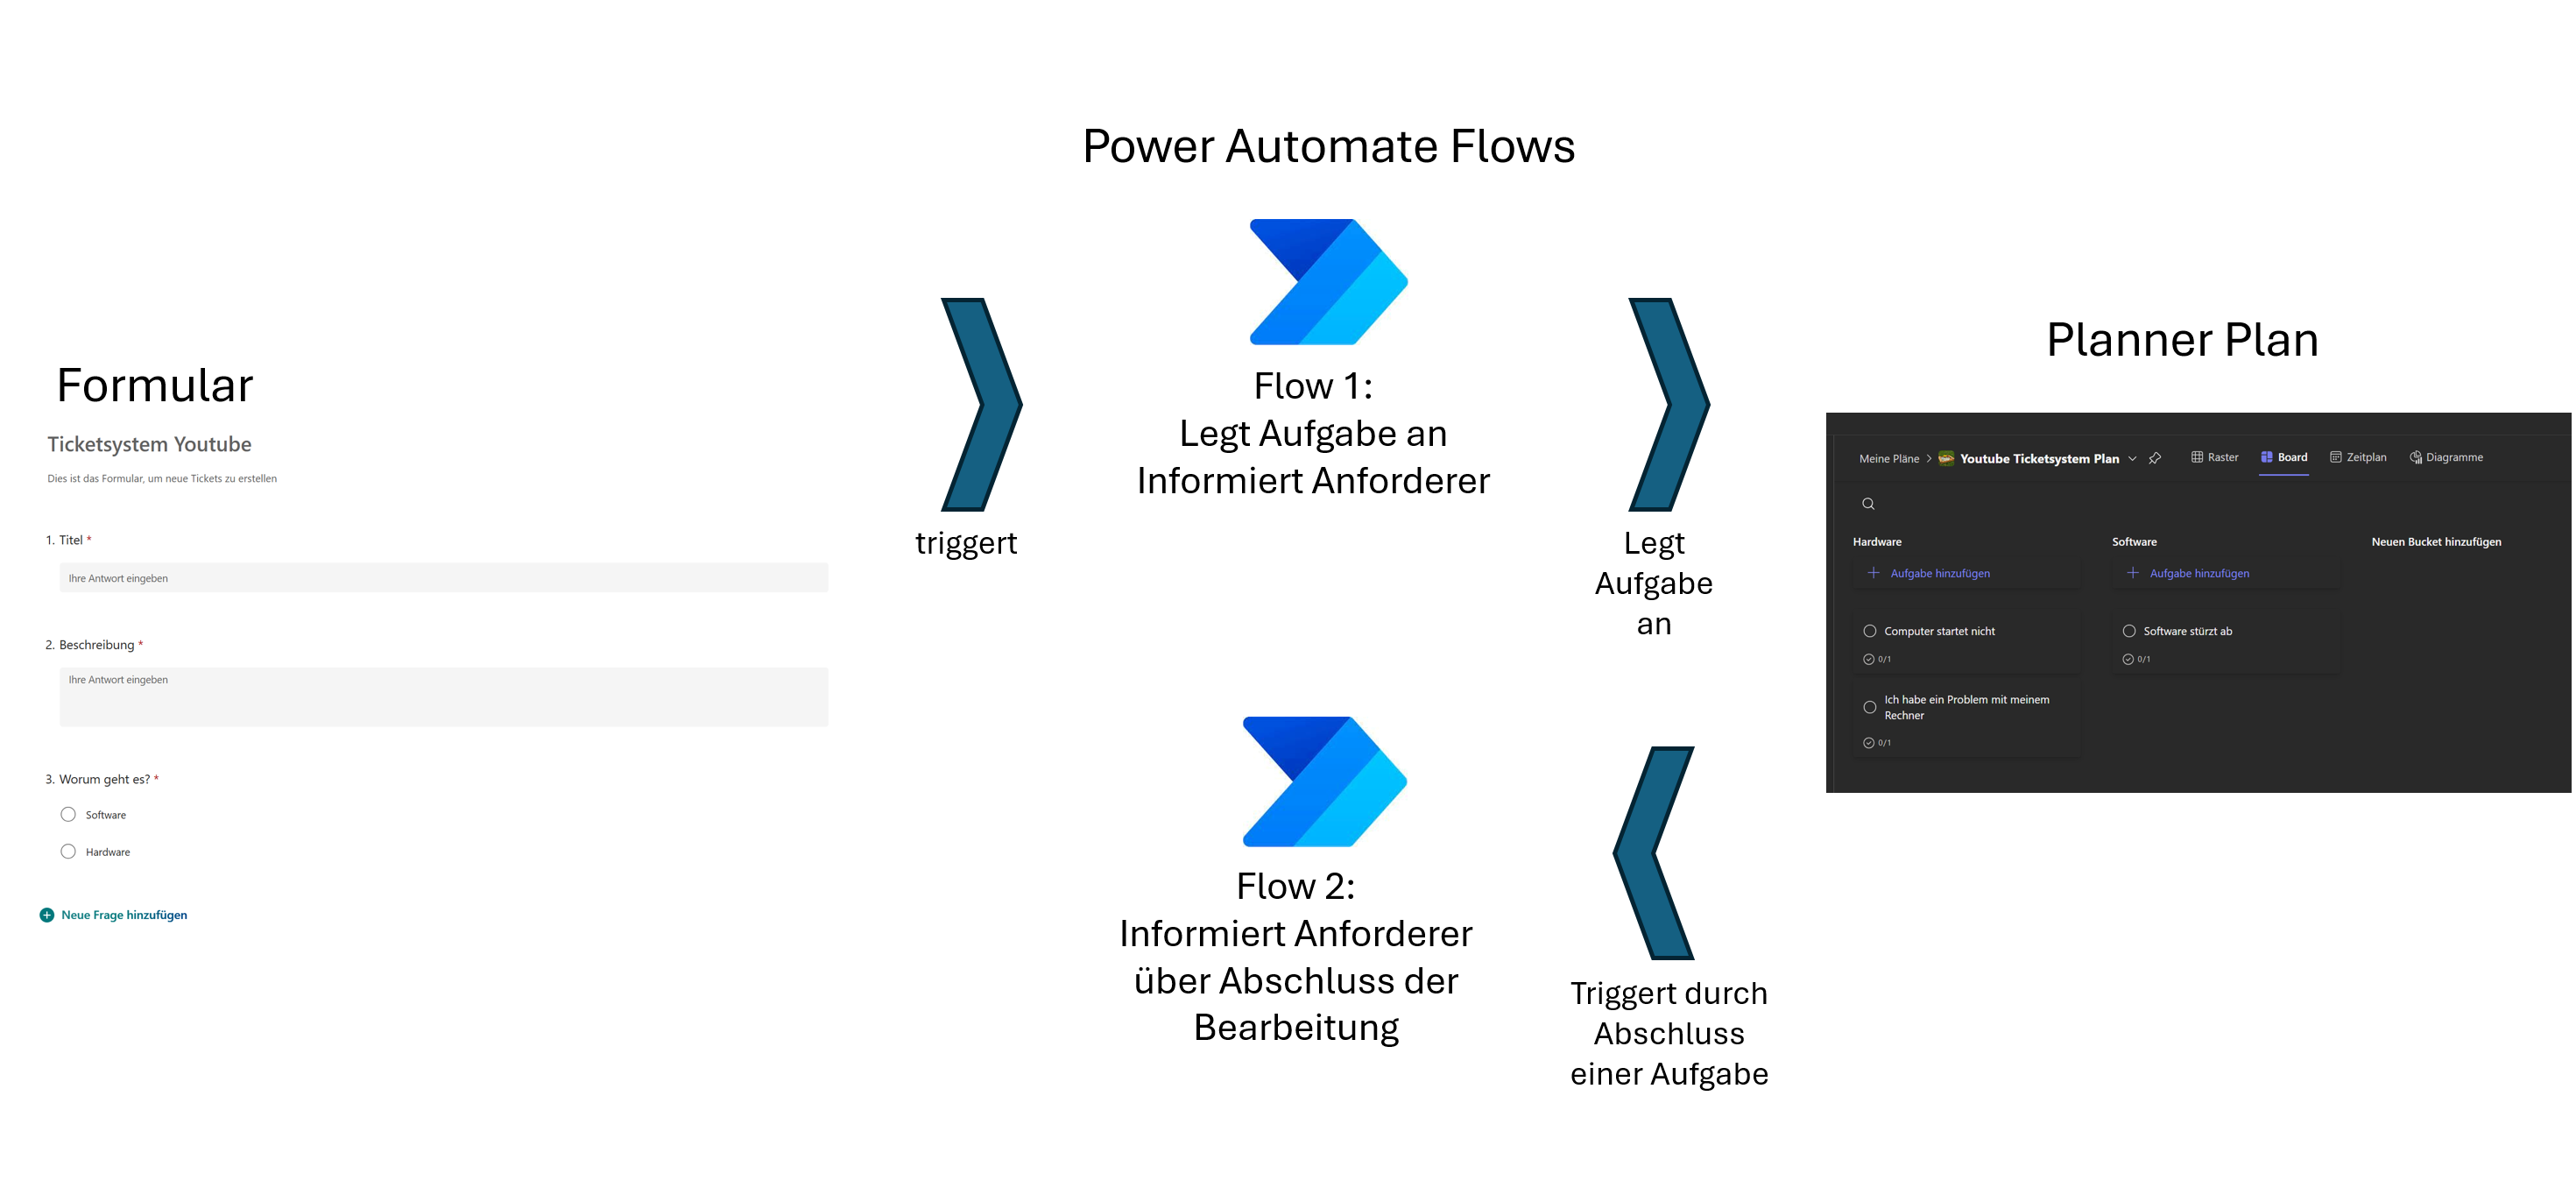
Step 1: Microsoft Forms – Create the Ticket Form
The first component – the Forms form – is provided to requesters so they can create new tickets.
- Open Forms (e.g. via forms.office.com/)
- Create a new form, e.g. “Ticket System – YouTube”
- Add questions
- Ticket title (short answer, required)
- Description (long answer, required)
- Category (choice, e.g. Hardware, Software, required)
- Settings
- Record name/email (depending on tenant/privacy policy) → important for feedback.
- Test: Fill out and submit in preview mode.
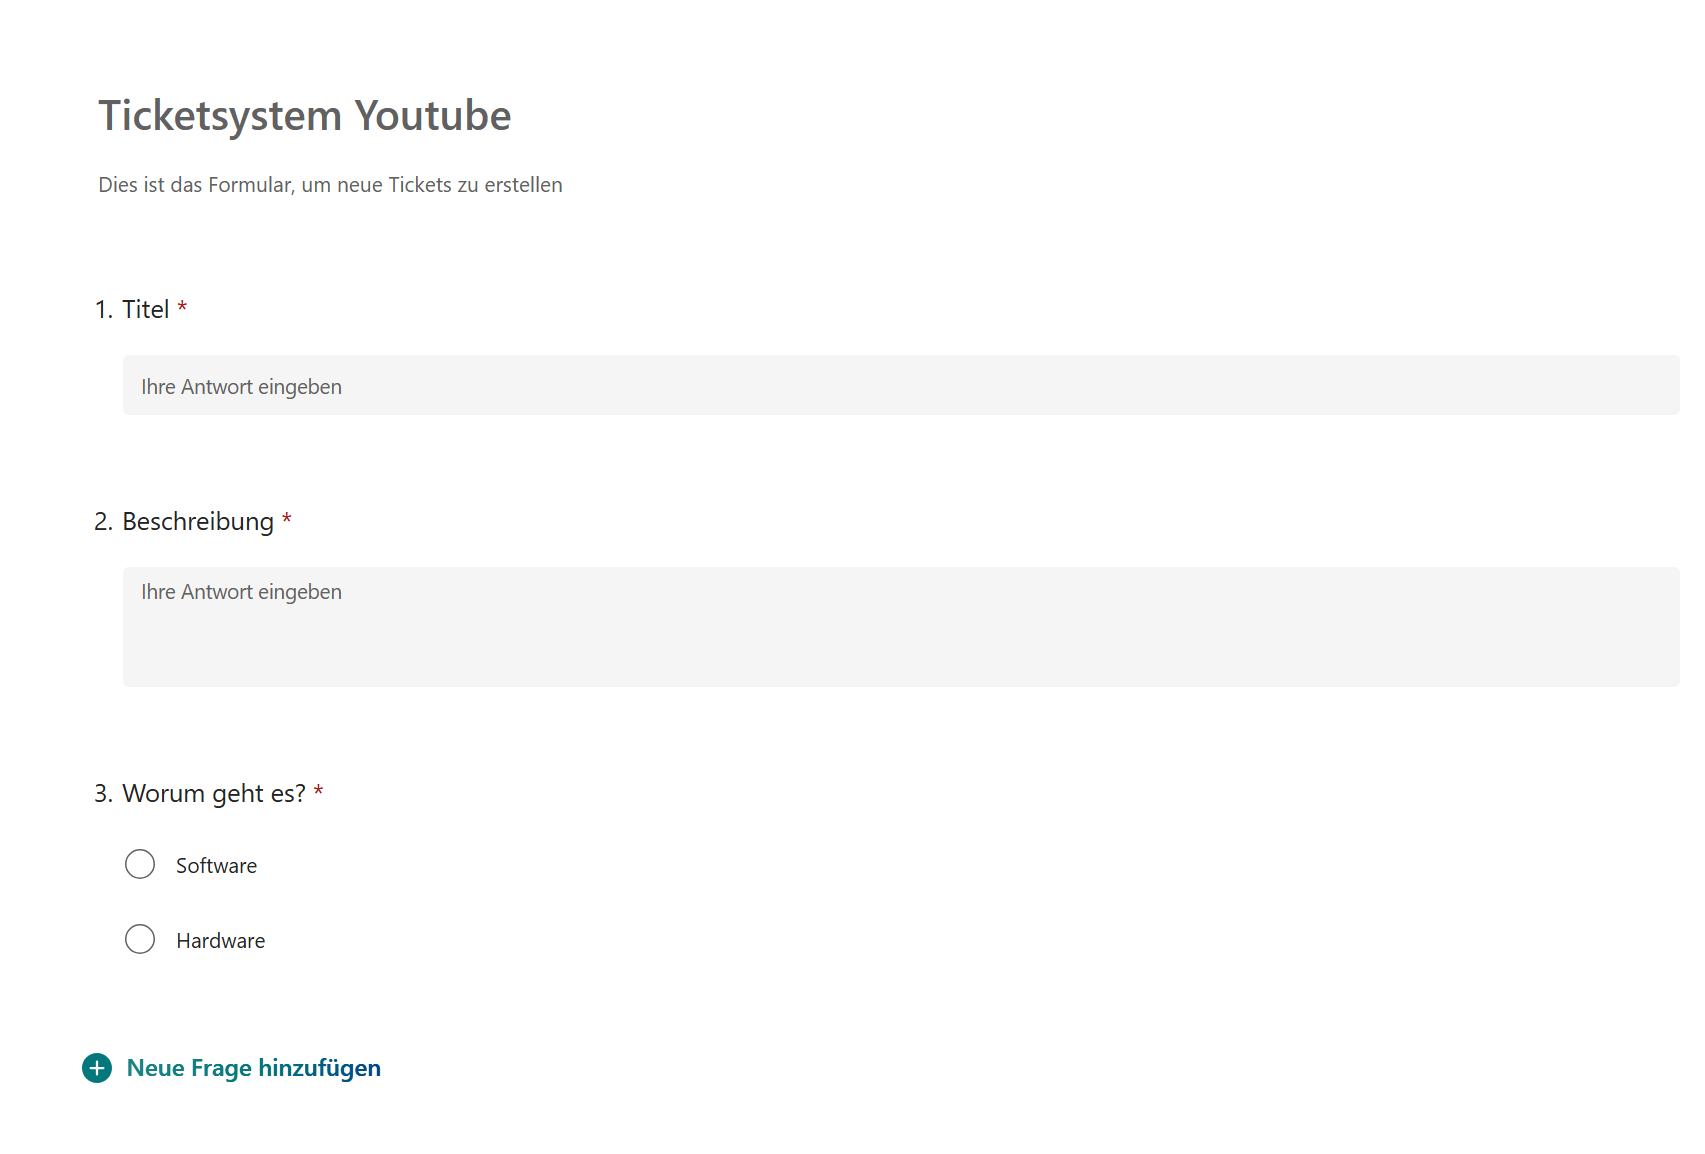
The finished form
Step 2: Microsoft Planner – Create Plan & Buckets
Planner (or the plan in Planner) is used to manage and process the created tickets.
- Open Planner (Tasks in Teams or
office.com→ Planner). - Create a new plan, e.g. “YouTube Ticket System”, in an appropriate Microsoft 365 group (e.g. Sandbox).
- Set up buckets: Hardware, Software
- Optional: Prepare priorities, labels/color categories.

The finished task plan
Note: Buckets are key for automatic categorization.
Step 3: Power Automate Flow #1 – Create & Notify Ticket
The first flow is used to react to newly created tickets (via the Forms form). The flow creates Planner tasks and informs the requester about the successful creation.
Goal: Automatically create a Planner task for each form submission, set description/metadata, store the requester’s email, assign a bucket, and send a Teams message.
3.1 Create Flow
- Automated cloud flow
- Trigger: When a new response is submitted (Microsoft Forms)
- Parameter: Form ID → your ticket form
3.2 Retrieve Response Details
- Action: Get response details (Microsoft Forms)
- Form Id: your form
- Response Id: Dynamic content → Response Id from trigger
3.3 Create Planner Task
- Action: Create a task (Planner)
- Group: your group (e.g. Sandbox)
- Plan: “YouTube Ticket System”
- Title: Form field “Ticket title”
- (Optional) Due date/priority
3.4 Update Task Details
- Action: Update task details (Planner)
- Task Id: ID from “Create a task”
- Description: Form field “Description”
3.5 Store Requester’s Email in Checklist
- Action: Update checklist item (Planner task)
- Task Id: from “Create a task”
- Checklist item Id:
0 - Title: Responder’s Email from Forms (dynamic content)
- Is checked:
false
Why a checklist? It’s a lightweight way to store the email on the ticket and retrieve it later in the completion flow.
3.6 Automatically Assign Buckets (Switch)
- Initialize variable
- Name:
BucketId(String)
- Name:
- Switch (on: Form field “Category”)
- Case “Hardware” → Set variable
BucketIdto Bucket ID “Hardware” - Default (Software) → Set variable
BucketIdto Bucket ID “Software”
- Case “Hardware” → Set variable
Find bucket IDs (one-time): Temporarily add List buckets (Planner) → select group + plan → inspect output → copy IDs → remove helper action again.
- Update task (Planner)
- Task Id: from “Create a task”
- Bucket Id:
variables('BucketId')
3.7 Teams Notification to Requester (personalized)
- Get user profile (Office 365 Users)
- User (UPN): Forms Responder’s Email
- Post message in a chat or channel (Teams) – Chat with Flow bot
- Recipient: Forms Responder’s Email
- Message (example):Replace
Hello @{outputs('Get_user_profile')?['body/givenName']}, your ticket "**@{outputs('Get_response_details')?['body/<FormFieldTitle>']}**" has been created. We’ll notify you once it’s completed.<FormFieldTitle>with the internal name of your form field (often “Title”/“Ticket_Title”).
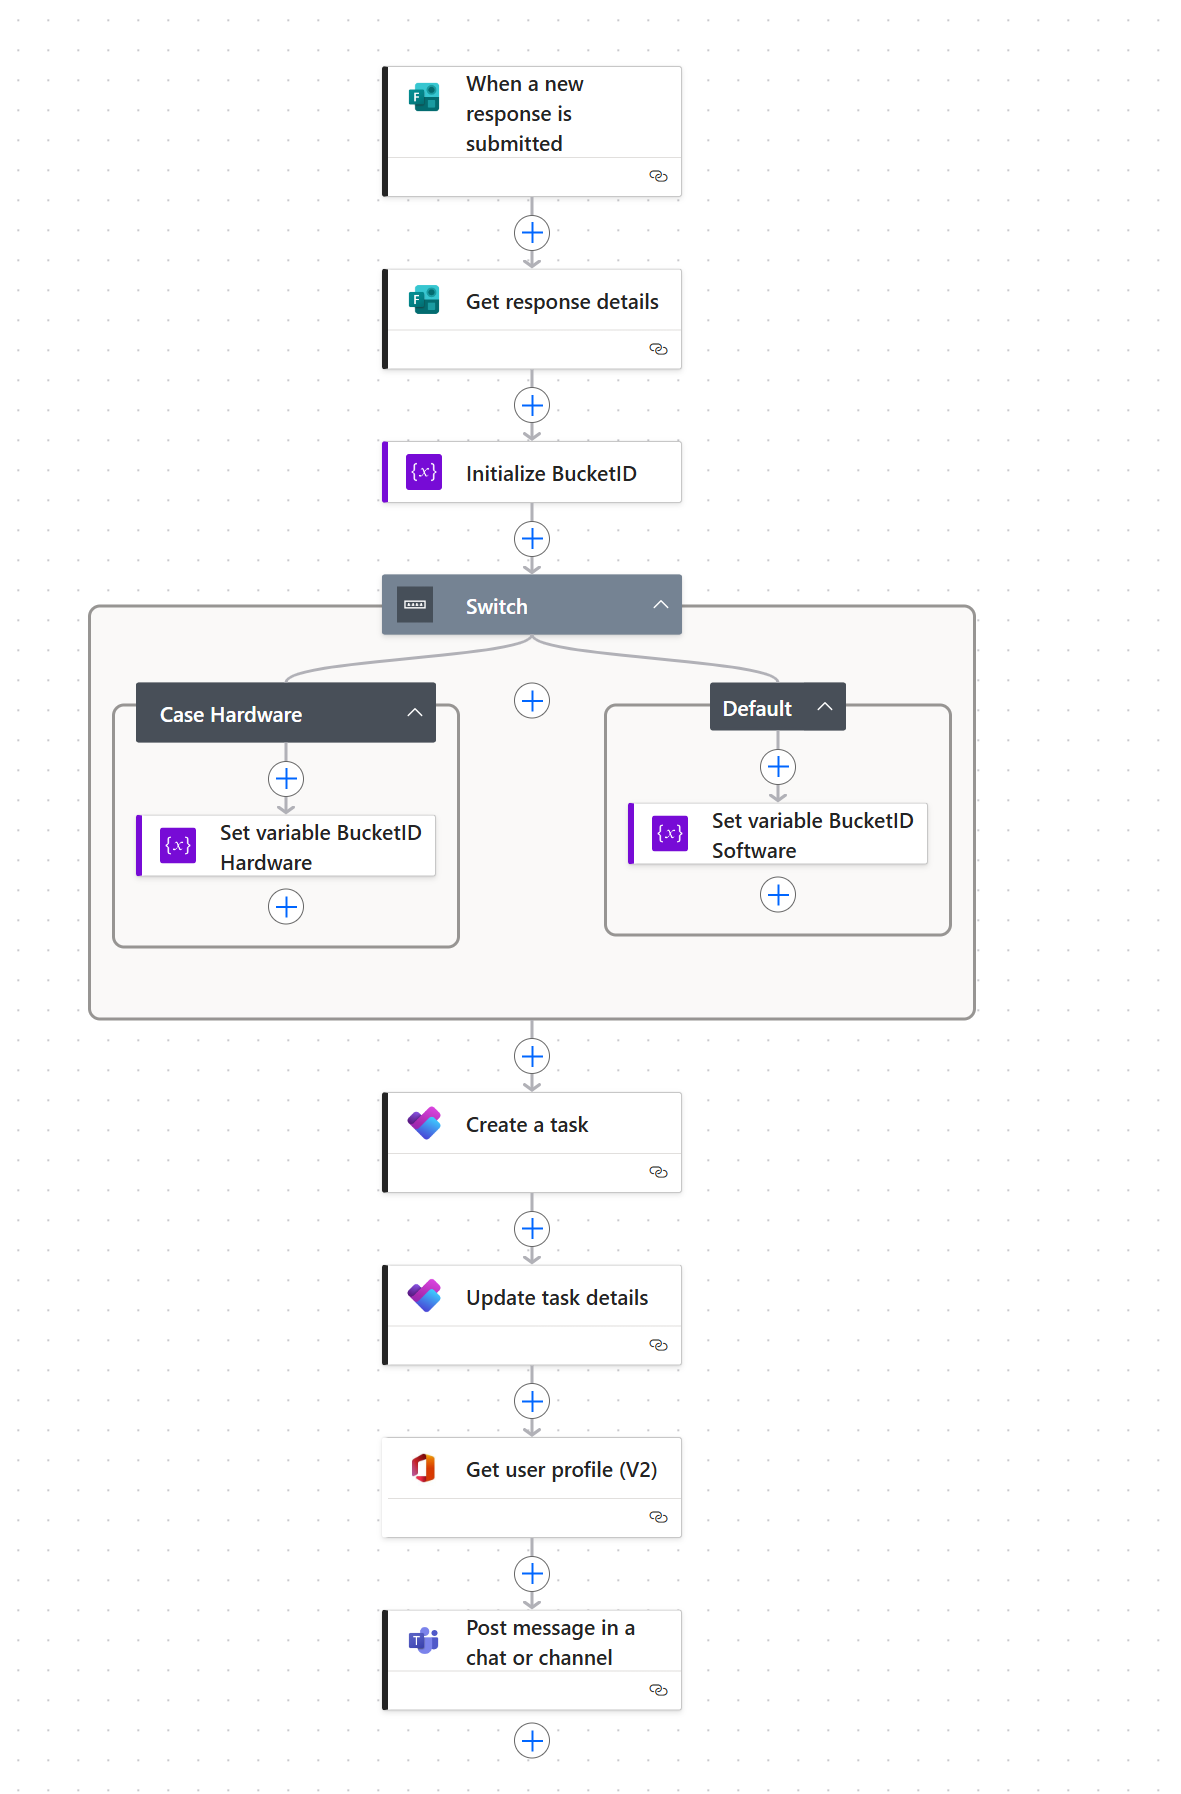
The first flow processing the form information.
Step 4: Power Automate Flow #2 – Automatically Notify Completion
The second flow reacts when a task is completed and informs the requester that their ticket is done.
Goal: As soon as a Planner task is Completed, the person from the form is notified in Teams.
4.1 Create Flow
- Automated cloud flow
- Trigger: When a task is completed (Planner)
- Group: Sandbox
- Plan: YouTube Ticket System
4.2 Get Task Details (incl. Checklist)
- Action: Get task details (Planner)
- Task Id: Task Id from trigger
4.3 Extract Email from Checklist
Depending on your environment, checklist can be an array or object. In many cases, the following (from the video) works:
body('Get_task_details')?['checklist'][0]?['value']?['title']
Alternatively, you can reference the first array element using first():
first(body('Get_task_details')?['checklist'])?['value']['title']
4.4 Load Display Name
Get user profile (Office 365 Users)
- User (UPN): Email from 4.3
4.5 Send Teams Message
Post message in a chat or channel (Teams) – Chat with Flow bot
Recipient: Email from 4.3
Message (example):
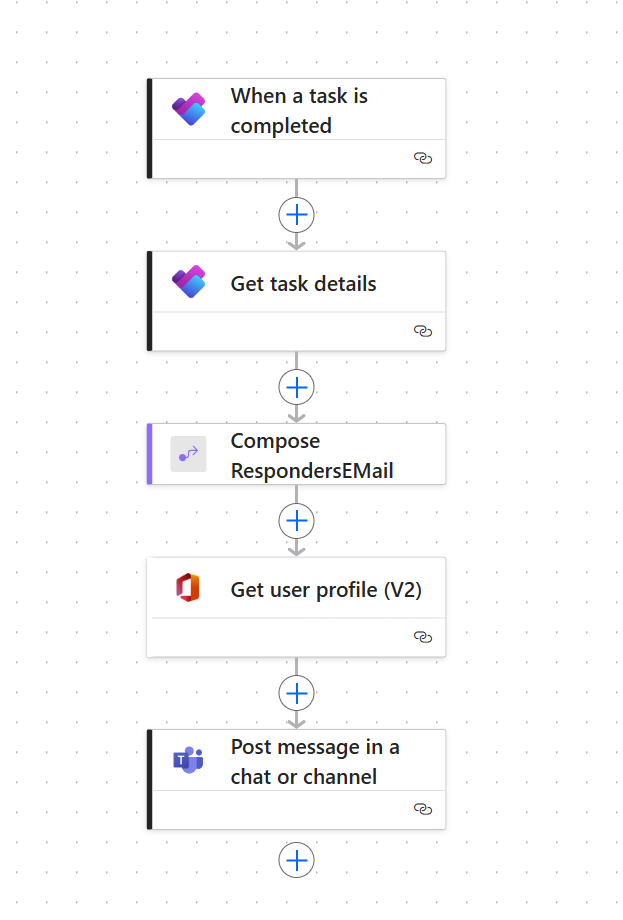
The second flow informing requesters after completion.
Extensions & Best Practices
File attachments in the form: Enable file upload (consider storage/compliance); store the link in the task description or comment.
Assignment by category: After task creation, use “Assign task” to automatically assign fixed owners per bucket.
Priorities & due dates: Transfer from form fields.
Data storage: Instead of the checklist, persist email e.g. in description or Dataverse (for scalability).
Alternative email notification: Use “Send an email (V2)” from Outlook – same email variable.
Multilingual setups: Clearly name flows and fields (DE/EN) for mixed tenants.
Security/privacy: Collect only necessary personal data; define deletion/retention periods.
Video tutorial for this blog post (YouTube | external link)
Conclusion & Contact
With Forms + Planner + Power Automate, you can quickly build an intentionally simple ticket system – ideal for small IT teams, clubs, or departments. It’s easily expandable (assignment, prioritization, Dataverse, approvals).
👉 Questions or need help setting it up? Use my Contact – I can help with design, best practices, and scaling to the Power Platform.